
For the past few months, I’ve been working on a machine learning research project, which I just submitted to NeurIPS [update: it was accepted as a spotlight! Preprint here]. The scale is, all things considered, fairly small: the output limited to one paper and a handful of figures. Yet, I still needed to distribute the work along a mini-cluster in the cloud, keep track of thousands of different experiments, track key performance metrics over time, and integrate a half-dozen datasets and a dozen models.
At that scale, it’s pretty easy to shoot yourself in the foot: introduce a data loading error that invalidates your results, forget to keep track of which parameters you used for which experiment you ran months ago, have a figure that’s not easily reproducible because the steps to reproduce the figure have been lost through the sands of time, etc. 25% of papers in machine learning actually publish their code, and I have a feeling that a big chunk of the other 75% is because people hesitate to share their messy creations, or the code is so brittle that it self-destroys as soon as you see it and they don’t want to support it.
Here’s the stack that I used for this project, the reason I took some decisions, and some lessons I learned. I think that the organization I show here is appropriate for small research teams like academic labs and early-stage startups. Some of this is a little pedestrian, but I hope you learn a thing or two. Let me know about your experiences in the comments.
Decision points
Local vs. cloud
The Full Stack Deep Learning class from Berkeley is a good place to learn how to organize deep learning projects. I had originally intended to go all-in on cloud infra to run models and analyze data. The class makes a solid argument that it ends being cheaper to build your own machine for local testing, then scale on the cloud as needed. I had a several years old deep learning rig with a 1080 Titan lying around, so I ended up wiping the drive and installing Ubuntu 20 on it for local bleeding edge development. I would then push the code to github when the code was ready to be scaled and run on cloud infra. Having a local dev machine doesn’t mean you’re locked to that place: you can still set up remote ssh access, but given that it was winter and we were on lockdown I never had a reason to do it.
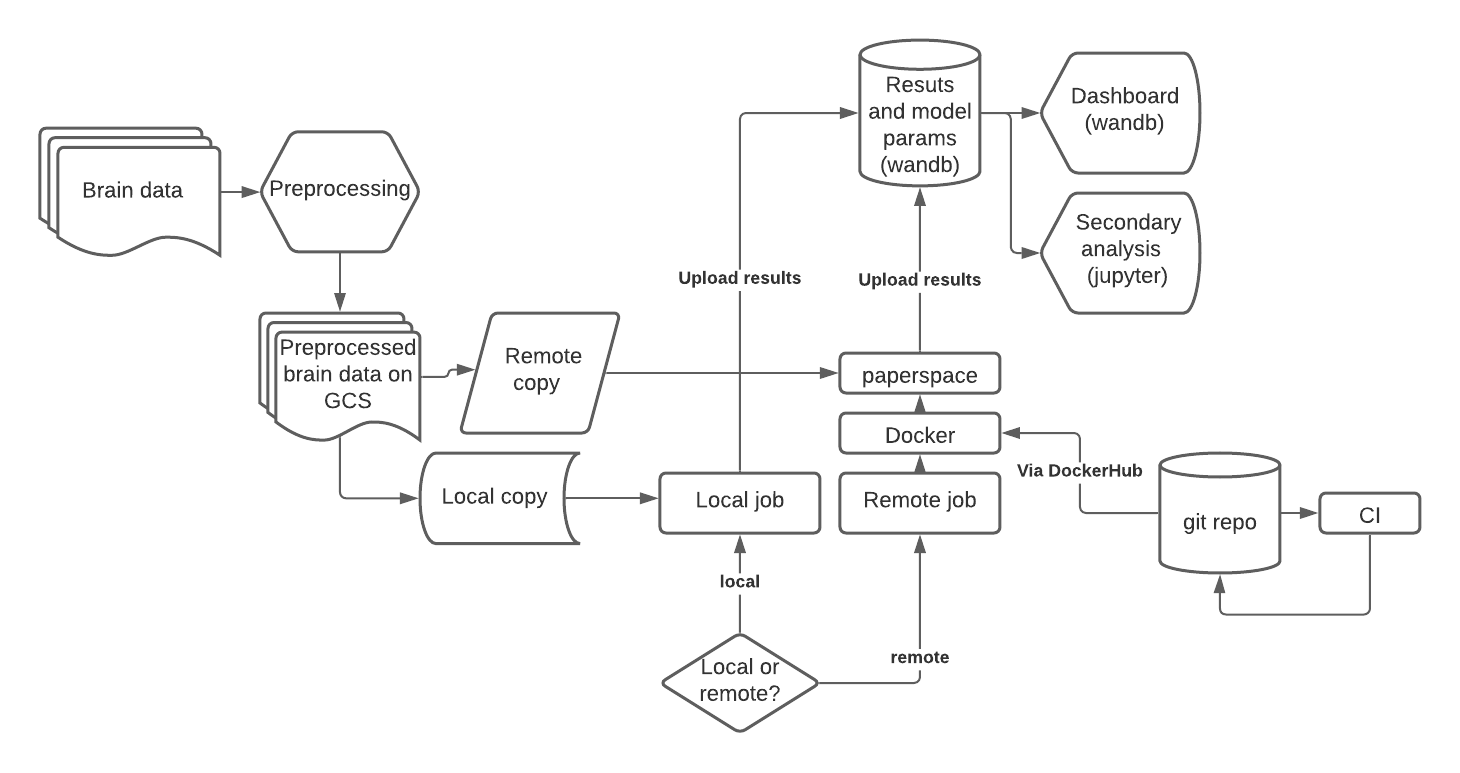
I had spent far too many afternoons figuring out (and yelling at and crying about) kubernetes on Google Cloud last year, so for this project I decided to avoid managing cloud infra by using a managed on-demand service. I wanted a central server where I could submit a batch job and it would provision the right machine to run the job and store the results somewhere in the cloud. Importantly, I wanted it set up in a way that I wouldn’t have to pay for a central server, only for the workers. I ended up using paperspace gradient for this purpose, which at the time, had cheap prices for GPU instances, and offered a straightforward product called experiments which was meant for exactly the purpose I wanted. This setup worked great for the first 3 months, but then Gradient changed their product to focus on a more turnkey solution, and from that point on the original product stopped working properly (multiple jobs would hang, you couldn’t find jobs from the interface, customer support was abysmal). Next time, I will try AWS Batch, and perhaps I will dip my toe into SageMaker to get access to a cloud jupyter notebook for analysis.
Code organization
One unexpected advantage of using this hybrid local/cloud setup is that it immediately imposed a certain discipline on the project: gradient runs your code inside a docker container, so you have to have a docker container ready, hence you are documenting your dependencies as you go along. I used the Pytorch docker container base and kept adding dependencies as needed, and used dockerhub to build the containers in the cloud.
This setup also imposes a workflow that focuses on creating batch jobs as Python scripts as opposed to jupyter notebooks. Jupyter notebooks are great for analysis, but building models in jupyter notebook is a bad idea – you pollute your global namespace, you risk running cells out of order, the editor has poor introspection so won’t tell you if you reference a variable that doesn’t exist following a long script, etc. I much prefer writing models and batch scripts in VSCode, using Black as an autoformatter.
If you’re used to a jupyter-notebook-based workflow, you’re probably used to writing small snippets of code, testing them in the cell on a handful of inputs, then lifting the code to a function which then you can integrate into the larger notebook narrative. With a batch-based workflow you lose this fast feedback process. The key to getting back that productivity – and then some – is to switch to test-driven development. Rather than informally testing snippets of your code in jupyter notebook, you create a separate test suite that calls the functions in your Python script and checks that their output is as expected. This forces you to write reasonably clean code with small functions that don’t have a lot of side effects. In practice, I didn’t aim for 100% code coverage, but instead focused on tests for data loaders and models. Testable code is also much easier to refactor, because you can easily see if you broke you code by re-running the test suite. Each test should only take a few milliseconds to run.
I enabled continuous integration (CI) in the Github repo to run my pytest suite via nose2 every time I pushed code. Unfortunately, a lot of that code depended on having GPU access on Github, which would have become expensive, so I didn’t end up using it. It does look like it’s possible to run test suites on a GPU-enabled machine via nvidia-docker.
I used an ad-hoc project folder structure inspired by PyRSE. Elizabeth DuPre told me about cookiecutter, which allows one to create projects from templates. I ended up using the datascience cookiecutter for a subset of the project, and generally I liked it (although it is a bit too nested for my taste).
TF vs. PyTorch
I’ve used TF in the past, but I decided to use PyTorch this round, since a lot of the models I wanted to test were released in PyTorch. The PyTorch documentation is excellent. A surprising chunk of my codebase ended up being training loops, so for next time I will consider PyTorch Lightning.
Storing results
One thing I never really spent time thinking about in grad school is how to store results. I have folders and folders in an old DropBox that are filled to the brim with mat files with long names from gosh knows what experiment. The problem with such ad hoc results storage is that you don’t know how the results were generated, because the results and the code are not linked.
Ideally, you’d like to store results in a centralized location with the following features:
- each result comes with metadata about how the result was generated (command line parameters, git hash, etc.)
- you can safely delete stale results
- you can query results to find the subet which you’re interested in
- you can visualize metadata about the results in graphical form (dashboard)
You could implement these functionalities yourself, for example with a local mongo database instance to store the results, and a dashboard of your creation, but I ended up instead using Weights and Biases (wandb). This turned out to be a great idea, highly recommended. In your code, you push your results along with metadata to their server using a simple library that you can pip install. The library takes care of adding the git hash to the payload so you know what code generated the result. You can also use the libary to send and store weights, images, checkpoints, etc.

You get a fully customizable dashboard built on vega-lite to keep track of your results. To retrieve your results, you use mongodb queries, so you can filter results by whatever property you desire. To have meaningful properties to query, I specify command line arguments to my training scripts via argparse, for instance number of filters, learning rate, epochs, etc. Then I send the argparse arguments to wandb when I save my results. That way I can easily filter by learning rate, for example.
Locally, I do still use tensorboard to babysit my networks, especially with a new network when it’s not clear whether the training will converge or not. I find that tensorboard is good to diagnose one model, but it’s not great to keep track of multiple models (say, more than 5) – pretty soon all you see is a mess of training curves.
Analyzing results
I use jupyterlab locally to analyze my results. One thing that I don’t like about jupyter notebooks is that it doesn’t play well with git – the diffs are meaningless. I will try out jupytext, which allows to write jupyter notebooks as plain text.
Mistakes I made
I accumulated a lot of technical debt around a seemingly innocuous decision about data storage. I downloaded brain data in ad hoc formats from multiple public sources (crcns), and I originally wrote a PyTorch data loader for each data source. That meant that for every new brain dataset I wanted to integrate, I would write a new data loader, which would take care of filtering out bad records, splitting the data into train and test set, and transforming it into the format that PyTorch expected.
That worked fine for the first 2 or 3 datasets, but pretty soon it became a liability. The ad-hoc formats were not always designed for rapid loading – some datasets were really slow to load because they used small block sizes in hdf5. Other datasets needed some manual curation. What I needed is an intermediate format – I would preprocess the datasets into the intermediate format once, and then load the intermediate format in the data loaders.
What I should have done is have one true intermediate format – e.g. NWB – I should also have decided train/test splits during the preprocessing. The data needed to be in a FAIR format in the intermediate stage – it needed, especially to be interopable. What I ended up doing is having a bunch of ad hoc intermediate formats – I would minimally preprocess the data and save it in a format parallel to the original one. Ultimately, that meant having to make a lot of micro decisions (e.g. how do I specify the train/test splits – two datasets, or one dataset and two sets of indices?) that I made inconsistently across datasets, and it became a mess that I never bothered fixing. My test suite for loaders ballooned as I had to cover for corner cases for every loader. Doing it over again, I would find settle on one true intermediate format.
I experimented a bit with using make to create the intermediate format, and I think it’s a great solution for this use case. make will create intermediate results if they don’t exist but won’t try to recreate them if they’re already there; an ideal solution to manage complex pipelines.
Releasing code and models
I didn’t really think much about making the code easy to run for others, but when it came time to release it (for reviewers), it only took me about a half day to clean up the codebase and write docs. The code was already logically organized, the dependencies documented, most everything ran automatically with bash scripts, so all in all it was much less trouble to release than a typical project I would have undertook in grad school. That being said, I would like to release the model in an easy-to-use way. It’s unfortunate that huggingface models are restricted to transformer models, that would have been ideal. I was recently made aware of cog, which aims to make model releases easy, complete with docker environment and downloadable weights. The weights themselves can be stored on figshare (free bandwidth!)
Keep/change/try
| Keep | Change | Try (more) |
|---|---|---|
| Pytorch | Paperspace -> AWS batch | Jupytext |
| wandb | Ad hoc intermediate format -> NWB | Make |
| Mixed local/cloud development | Google Cloud Storage -> S3 | Data science cookie cutter |
| vscode | PyTorch Lightning | |
| Test-driven development | cog | |
| Black | SageMaker | |
| Docker |
What’s your stack? What tool has made your life easier?
